Why Your Outdoor Glow Fails—A Quick Diagnostic Check
Nothing's more annoying than planning an evening cookout only to find your pathway shrouded in darkness. Your solar lights worked perfectly last month, and now they've ghosted you completely.
I've been troubleshooting outdoor lighting systems for years, and I can tell you this happens to everyone eventually.
Here's the good news: most solar light failures aren't actually "failures" at all. They're maintenance issues masquerading as broken equipment.
Your solar lights are likely not working because of dirty solar panels, dead or worn batteries, or poor sunlight exposure. Other common culprits include moisture damage, a faulty light sensor, or broken wiring.
Let me walk you through each issue and show you exactly how to fix them—plus, I'll share some insider knowledge on why certain lights keep failing while others just keep working.
The 6 Most Common Reasons Solar Lights Fail (And How to Fix Them)

1. Insufficient Sunlight (The Energy Starvation)
Your solar light is basically a miniature power plant. No fuel? No power. It's that simple.
The Problem: Most solar lights need 6-8 hours of direct sunlight to charge fully. "Direct" is the key word here. If your light sits under a tree branch, behind a fence shadow, or even charges through a window, it's getting maybe 30-50% of the energy it needs. I've seen customers place lights under patio covers thinking they'll work fine—they won't.
Here's the math: for every hour of quality sunlight, you get roughly 2-3 hours of illumination. If your light only gets 3 hours of partial sun, you're looking at maybe 5 hours of weak light at best.
The Fix:
- Observe your light's location throughout the day. Does it get full, unobstructed sun from 10 AM to 4 PM minimum?
- Relocate the fixture to a sunnier spot. South-facing locations work best in the Northern Hemisphere.
- Trim back any vegetation that's casting shadows. Even seasonal changes can block light as the sun's angle shifts.
But here's where things get tricky with traditional solar lights: the best spot for charging is rarely the best spot for lighting. You need light under your dark carport, but the carport blocks the sun. See the problem?
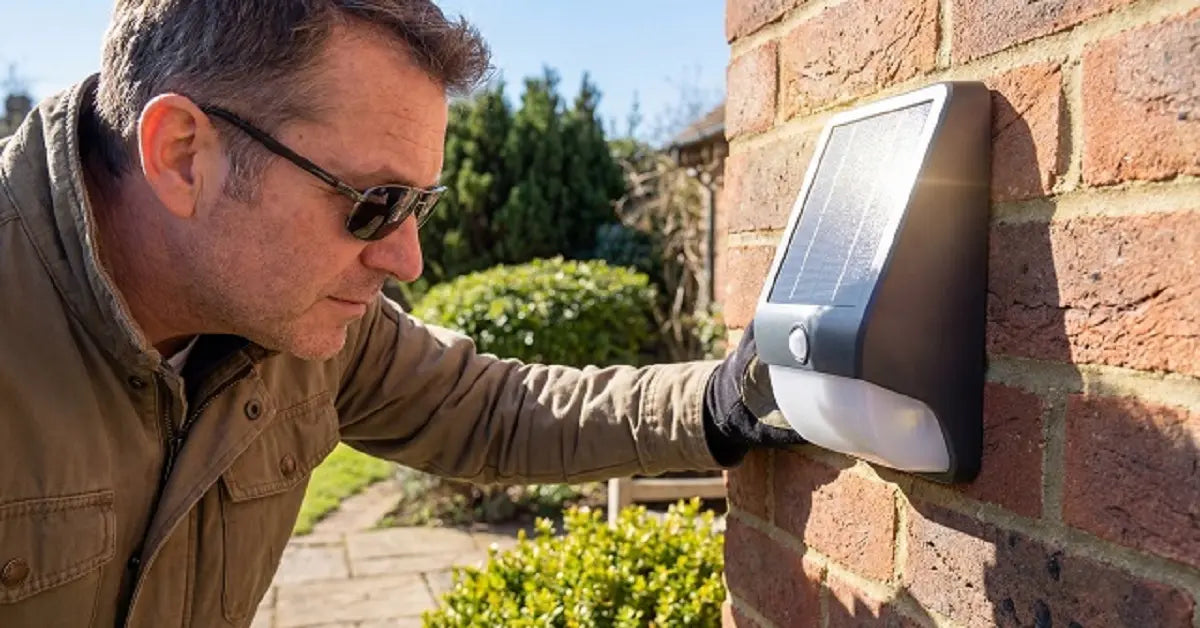
2. Dirty Solar Panels (The Charging Barrier)

Think of your solar panel like your phone screen—after a few weeks outdoors, it's coated in grime you didn't even notice accumulating.
The Problem: Dust, pollen, bird droppings, and even morning dew residue create an invisible film. This film can reduce charging efficiency by 50-70%. I've cleaned panels that looked "fine" to the naked eye and immediately saw runtime double.
The Fix:
- Grab a soft microfiber cloth and dampen it with plain warm water—no soap, no chemicals.
- Gently wipe the entire panel surface in circular motions.
- Dry with a clean cloth to prevent water spots.
- Set a phone reminder to repeat this monthly, or bi-weekly if you live in a dusty area.
This two-minute task can literally resurrect a "dead" light. I once had a customer ready to throw away a $200 fixture. One cleaning later, it worked like new.
3. Dead or Weak Batteries (The Heart Failure)

Batteries are the heart of your solar light system, and like any heart, they eventually wear out.
The Problem: Rechargeable batteries endure constant charge-discharge cycles. After 300-500 cycles (roughly 2-3 years for NiMH batteries), their capacity diminishes. A battery that once held enough charge for 10 hours might now only manage 2-3 hours. Cheaper lights often use smaller batteries that cycle more frequently—and die faster.
Cold weather accelerates this death. Leaving lights out during freezing winters without removing batteries can permanently damage them.
The Fix:
- Open your light housing (usually a few screws on the back or bottom).
- Remove the old battery and check for corrosion—white or green crusty buildup is a red flag.
- Replace with the correct type: NiMH (1.2V) or LiFePO4 (3.2V)—never use regular alkaline batteries.
- If you're unsure whether the battery is the issue, swap in a known good battery of the same type to test.
Pro tip: Before you replace anything, test if your unit is receiving power using our diagnostic guide. It might save you from buying batteries you don't need.
The real game-changer? Lights with 12,000mAh batteries like higher-end systems don't just last longer—they cycle less deeply. A bigger battery charged to 60% will outlast a tiny battery stressed to 100% every single night.
4. Faulty Light Sensor (The Nighttime Blind Spot)
Your solar light uses a tiny photocell sensor to "know" when it's dark. When this sensor malfunctions or gets confused, your light stays dark all night.
The Problem: The sensor might be obstructed by dirt, spider webs, or worse—it's being tricked by nearby light sources. I see this constantly with lights placed near streetlamps, porch lights, or even a neighbor's bright security light. The sensor thinks it's still daytime and never triggers.
To understand the inner mechanics of how these photocells regulate power, it helps to know they're basically tiny switches that respond to light levels. When ambient light drops below a threshold, the switch closes and power flows to the LED.
The Fix:
- Clean the sensor lens with a soft cloth—treat it like you treat the solar panel.
- Perform the darkness test: completely cover the solar panel with your hand or a cloth during daytime.
- If the light turns on immediately, your sensor works fine—you just need to relocate the light away from interfering light sources.
- If nothing happens, you might have a dead sensor requiring manufacturer support.
Here's the advanced insight: integrated solar lights (where the sensor is built into the same unit as the panel and LED) face a geometric problem. The sensor's location is fixed. If that location happens to catch glare from a streetlight 50 feet away, you're stuck.
The solution? Systems with separate motion sensor cases that you can position independently. Better yet, linkable technology where multiple lights communicate—if one sensor fails, the others compensate. It's redundancy built into the system architecture.
5. Corrosion and Water Ingress (The Internal Threat)

This is the silent killer of solar lights, and it's fascinating from a chemistry standpoint.
The Problem: Even "weatherproof" lights experience moisture infiltration. Here's how it happens: during the day, the sun heats your light housing. At night, temperatures drop. This creates pressure differences that literally "breathe" humid air into the fixture through tiny imperfections in seals.
Inside, this moisture condenses on cold metal contacts. Add a small electrical current, and you've created a perfect electrochemical cell—also known as corrosion. That green or white crusty buildup on battery terminals? That's oxidation destroying your electrical connections.
The Fix:
- Carefully open the light housing and inspect for moisture or fog inside the lens.
- If wet, dry it thoroughly using a hairdryer on low setting—keep it moving to avoid melting plastic.
- Check battery terminals and wire connections for corrosion.
- Clean corroded contacts using a pencil eraser for light buildup, or fine sandpaper for heavier corrosion.
- Apply dielectric grease to terminals before reassembly—this creates a moisture barrier.
- Inspect the housing gasket. If it's cracked or hardened, seal gaps with clear silicone gel.
Prevention beats repair: Lights with IP65 or higher ratings use superior sealing. The difference between IP44 and IP65 might seem minor on paper, but it's the difference between replacing lights every year and forgetting they exist.
6. Broken Wiring or Components (The Physical Break)
Sometimes the problem is literally broken hardware—and you can usually spot it with a careful inspection.
The Problem: Internal wires can fray from constant vibration, thermal expansion/contraction, or even pest damage (mice love chewing wires). Solder joints crack. LED chips fail. These are physical failures that no amount of cleaning will fix.
The Fix:
- Visually inspect all exterior wiring for cuts, exposed copper, or melted insulation.
- Open the housing and check internal connections—look for loose wire terminals or detached components.
- Gently tug on wire connections to ensure they're secure.
- If you have a multimeter, test for continuity through the circuit. No continuity means a break somewhere.
- Simple rewiring repairs can be done with solder and heat-shrink tubing. Complex circuit board damage requires professional help or replacement.
If you're finding multiple loose connections or corroded wiring throughout the unit, it's often a sign of poor build quality rather than bad luck.
Deep Dive: Issues You Can't See (Advanced Troubleshooting)

The "Ghost Charge" Phenomenon
Ever had a light that seems to charge all day but dies within an hour after sunset? This is what I call the ghost charge.
The Reality: The battery appears to charge (the light turns on briefly), but it can't hold that charge. This happens when batteries reach end-of-life—they accept a surface charge that immediately dissipates under load. It's like a bucket with a hole in the bottom.
Another culprit: the charge controller circuit. This tiny component regulates power flow between the panel and battery. When it malfunctions, it might allow the battery to charge to only 20% capacity instead of 100%, or it might allow the battery to overcharge and degrade faster.
One more common mistake: using standard alkaline batteries (1.5V) instead of rechargeable NiMH (1.2V). The voltage mismatch stresses the circuit and causes erratic behavior.
The Corrosion Killer: Why Water Gets In
All quality solar lights claim weather resistance, but there's weather resistance and then there's weather resistance.
The Reality: Cheap fixtures use minimal gaskets—sometimes just a thin foam strip or no seal at all. These compress and degrade within months. Water finds a way. Premium systems use multi-layer sealing with rubber O-rings, silicone gaskets, and proper drainage channels.
The IP rating tells the story. IP65 means dust-tight and protected against water jets from any direction. IP44 means protected against splashing water. That's the difference between surviving a monsoon and failing in a drizzle.
The "Shadow Trap": Why Your Light Might Be In the Wrong Spot
This is the fundamental design flaw of integrated solar lights, and it's one most people don't realize until they've bought three replacement units.
The Reality: You need light in your dark garage. But your garage is dark precisely because it doesn't get sunlight. An integrated light (panel attached to the fixture) can't solve this geometric impossibility. You're forced to compromise—either place the light in partial sun and accept weak performance, or place it in full sun and accept that it's not actually lighting your target area.
The same issue plagues sensor placement. If your all-in-one fixture has the sensor on top, it's exposed to street lights, car headlights, and every other light source that passes by. You can't adjust it. You can't optimize it. You're stuck with the manufacturer's one-size-fits-none positioning.
Stop the Cycle of Replacing Cheap Lights: The Engineered Solution

After fixing your third solar light this year, you start to realize: you're not dealing with "bad luck." You're dealing with bad design.
Let me share some engineering insights from years of product development. The failures I've described aren't random—they're predictable outcomes of cost-cutting decisions. Small batteries, integrated designs, inadequate sealing—these aren't accidents. They're compromises.
Solving "Insufficient Sunlight" with a Detachable Panel
Remember the shadow trap? The solution is simple in concept, challenging in execution: separate the solar panel from the light.
The Intelamp outdoor solar flood lights with remote control feature a 16.4ft separate cable. Mount the panel on your sunlit roof. Mount the light under your dark carport. Problem solved. This isn't just convenience—it's architectural freedom. You're no longer fighting physics.
Solving "Dead Batteries" with 12,000mAh Capacity
Battery death is inevitable, but you can dramatically delay it with proper engineering.
Small batteries cycle deeply every night—charging to 100%, discharging to 20%, then back to 100%. Each deep cycle wears them down. The 12,000mAh massive battery in advanced systems cycles shallowly. It might charge to 70% and discharge to 50%. Shallower cycles mean exponentially longer lifespan.
Plus, you get legitimate all-night runtime even in winter when charging is reduced. No more lights dying at 11 PM just when you need them.
Solving "Sensor Failure" and Coverage Gaps with Linkable Tech
The future of outdoor lighting isn't individual units—it's networked systems.
Linkable technology allows multiple fixtures to communicate wirelessly. One sensor detects motion, and all connected lights activate within 100 feet. This creates overlapping coverage zones with no blind spots. If one sensor fails, the others back it up.
The separate motion sensor case lets you position the sensor optimally—aim it down your driveway while the light illuminates your porch. The sensor has a 26ft detection range, but the linked lights extend coverage far beyond that single unit.
And yes, proper IP65 sealing throughout prevents the corrosion issues we discussed earlier.
Ready for the Upgrade?
You've learned how to fix cheap lights. Now consider whether you want to keep fixing them or invest in lighting that simply works.
Browse our durable solar collection to explore systems designed around eliminating failure points rather than working around them.
FAQs
How do you fix solar lights that stopped working?
Start with the basics: ensure the light is switched on and the solar panel is clean and receiving at least 6 hours of direct sunlight. Clean the panel with a damp cloth and check that the batteries aren't dead or corroded. Inspect wiring for damage and make sure the photocell sensor isn't obstructed or confused by nearby light sources. A simple reset—turn off the light, remove batteries for 10 minutes, then reconnect—often resolves glitches. Follow the systematic troubleshooting steps I've outlined above for persistent issues.
Can the batteries in solar lights be replaced?
Absolutely. Rechargeable batteries should be replaced every 2-5 years depending on quality and usage. NiMH batteries typically last 300-500 charge cycles, while premium lithium-ion batteries can exceed 1,000 cycles. Always replace with the correct type—NiMH (1.2V) or LiFePO4 (3.2V)—and never use standard alkaline batteries. Most manufacturers sell replacement batteries on their websites. Check your model's specifications before purchasing.
Do outdoor solar lights eventually stop working?
Yes, all solar lights will eventually degrade. The weakest link is typically the rechargeable battery, which loses capacity through repeated charge-discharge cycles. Quality lights with proper maintenance can last 5-10 years before major component replacement is needed. Cheaper models might fail within 1-2 years due to poor sealing, undersized batteries, or inferior LEDs. External factors like extreme weather, water ingress, and physical damage accelerate failure.
How long should solar lights last?
Lifespan varies dramatically by quality. Budget models often fail within 1-2 years. Mid-range lights typically last 3-5 years with proper maintenance. Premium systems with quality components can exceed 10 years. Key component lifespans: batteries (2-5 years), LEDs (rated for 50,000+ hours but can fail earlier from moisture or power surges), and solar panels (15-25 years for the cells themselves). The housing and seals often fail before the electronics in cheaper models.
Featured Articles
How Do Solar Lights Work? The Ultimate Simple Step-by-Step Guide